If you have ever traveled through Texas and visited the factories in El Paso, I’m sure you will be overwhelmed by how artisans – bootmakers create western cowboy boots and their fragrance.
Western boots are one of the fun embodiments of the Texan lifestyle, strong, wild, confident and industrious.
Today, western cowboy boots are gradually conquering the mass community with more diverse designs and creative, attractive styles to suit a wider range of wearers.
Many people wonder how to make a pair of western boots. With such a different construction, can they be produced like other footwear? Why do western cowboy boots possess such a unique and impressive style?
Today, we will tell you about the basic steps to make a cowboy boot and the interesting things behind those steps. Thus, you will have your own answer.
Sounds good?
Quick Navigation
How to Make Western Boots?
Leaving aside the closed industrial machinery processes that create boring cowboy boots on the other side of the ocean, we will only talk about real cowboy boots!
Real western cowboy boots are hand-made by artisans in America (mainly El Paso Texas) or Mexico (mainly Leon). They really give you a different perspective so you have your answer on why cowboy boots are so unique and impressive.
In fact, each bootmaker will have a different process or order. However, they will all have to go through the basic steps such as cutting leather, cording, sewing, etc.
Here are the details of these stages!

Step 1: Cutting leather
Cowboy boots are made from many different types of animal skins. The most popular skins are cowhide and ostrich leather. Besides, some other types of leather include snakeskin, elephant leather, caiman, and alligator, etc.
The most expensive cowboy boots are usually made from crocodile skin. The famous Lucchese brand has a pair of cowboy boots made from Blue Crocodile from the Nile, its price is up to thousands of dollars.
To create the shape of boots, put a stencil on the animal skin’s surface and use chalk to mark, then cut this part out.
The bootmaker usually uses a specialized hydraulic cutter with about 10 tons of hydraulic pressure to cut the skin into small and large pieces. This cut leather will be used on the outside of the western boots.
The lining is also usually made from leather. It will be printed with a number showing the size, style number, manufacturing date, width and the company’s logo.
Most high-quality cowboy boots are made from full-grain leather. This is the most original leather compared to other types of leather.
Full-grain leather gives a beautiful appearance over time. It is durable and provides a very high level of comfort for the wearers.
Cowboy boots are usually made from a large piece of full-grain leather, meticulously cut rather than assembled from small pieces of leather.

Step 2: Cording
This step is meant to create the outlook of cowboy boots.
The appearance of western boots is one of the beauties that has conquered the hearts of fastidious people.
The motifs of cowboy boots are elaborate and artistic. To make such a boot, bootmakers must be skillful and creative.
There will be a template for creating the patterns of cowboy boots. Apply glue to the template and use the twine to stick on pattern lines.
Then, the leather is placed on this template and put on a tray.
Put the tray into the sewing machine to make stitches and get the cording pattern.
You may not know: Each pattern and the stitching on the western boots do make sense, they are a signature of each different boot maker.

Step 3: Sewing leather together
Sew all parts of the leather together to connect the outside and lining leather. They are sewn together inside out.
Next is to roll down the seams for wearing cowboy boots smoothly without rubbing your legs.
If your new western boots rub your legs when you first put new western boots on, which means the seams of the boots are not rolled down carefully!
The last thing in this step is that the western boots are sucked into a tube to turn it right side.

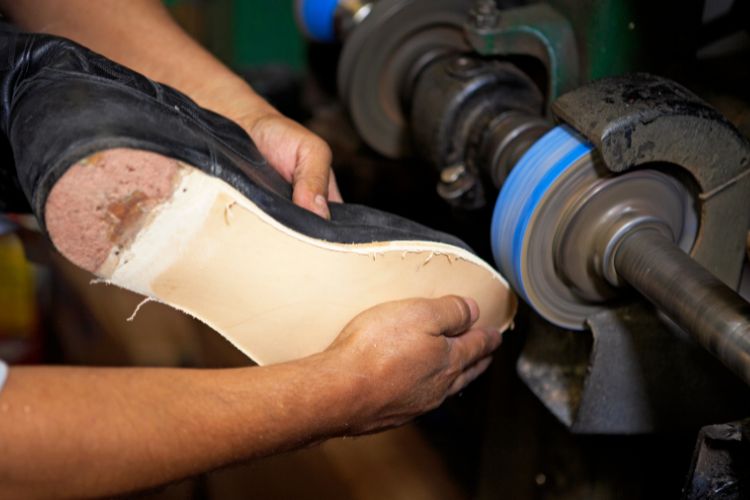
Step 4: Attaching the sole to the western boots
In this step, dip cowboy boots into the water and stretch them over the plastic last.
Then use a hammer to nail the cowboy boots into the sole. This is a very difficult step, requiring very high skills of the worker.
This process plays an important role in the feel and shape of western boots.
Next, the toe of the western boot is shaped and lasted.

Western boots have many types of toe shapes such as square toe, pointed toe and snip toe.
Different types of toe shapes will determine different styles of western boots.
Step 5: Drying the cowboy boots completely in the hot house
As you already know, water is the leather’s number one enemy. As cowboy boots get wet from the previous step, it’s time to dry them!
Cowboy boots will be stored in a hot house within 24 hours to completely dry them from the inside out.
The temperature in a hot house ranges from 100 to 120 degrees.

Step 6: Connecting leather insole and outsole
In this step, make the holes along the arch with a hammer and fill them with lemonwood pegs.
Some bootmakers often use metal nails instead of lemonwood pegs, but cowboy boot lovers still prefer lemonwood pegs.
For your information, lemonwood pegs soak up water as well as leather does.
So if you wear cowboy boots in the rain, or snow, or you have sweaty feet, the cowboy boots will either shrink or stretch simultaneously, which helps the boots’ shape remain the same.
Otherwise, when it comes to the metal nails, they gradually emerge from the sole over time.

Final step: Staining and giving the western boots a dashing look
For the finishing touch, use a staining varnish to paint all over the sole. Then buff the sole to achieve a beautiful shine.
The next step is to print the logo on the sole of western boots!
Have you ever wondered why a new cowboy boot always stands upright and has a glossy appearance?
Here’s why: Each Western boot is put on a hot ironing board so that it can be stiffened and steamed on the sides.
Next, brush the leather with an open flame to eliminate the remaining threads.
That’s it! We’ve got a complete western boot!
Read more: How to Dye Cowboy Boots Black
https://www.youtube.com/watch?v=gDFSwZ8r6pc
How long does it take to make a pair of cowboy boots?
It depends on whether cowboy boots are handmade or machine-made.
The time to make handmade cowboy boots ranges from 24h to 48 hours.
In which the process of drying cowboy boots in the hot house takes up the most time. The remaining stages won’t take much time.
For machine-made cowboy boots, it takes only an hour to produce many cowboy boots.
It is one of the main reasons why cowboy boots made from machines are much cheaper than handmade ones.
Some things about the history of cowboy boots
Western boots have a rich history dating back to the late 18th century and early 19th century.
While work boots were the first type of boots to emerge in Europe during the industrial revolution, cowboy boots became one of America’s earliest boot styles.
Unlike work boots, which were designed to serve laborers, cowboy boots were created specifically for farmers, commonly known as cowboys.
These boots needed to be durable enough to withstand the rigors of riding horses and offer ample foot protection. Additionally, they had to be affordable for the cowboys.

The design of cowboy boots features a high shaft, providing protection for farmers’ feet from external forces and dangerous animals such as rattlesnakes and scorpions.
In addition to aiding cowboys in horseback riding, cowboy boots feature high heels that can hook into the stirrups when needed.
While riders typically place the ball of their foot on the stirrup, there are instances where the heel may come into contact with the stirrup, providing additional support and preventing the foot from slipping too far forward.
Furthermore, traditional cowboy boots typically have pointed toes or round toes, which help cowboys easily slip into the stirrups.
Cowhide, readily available and abundant in the Western United States, became the material of choice for crafting these boots. It is both affordable and highly durable.
Through extensive development and transformation over time, today’s cowboy boots have diversified into various types, including stockman, roper, and western work boots.
They not only find their place on vast farms but have also become distinctive and expensive fashion accessories.
The evolution of cowboy boots has resulted in greater diversity in style and construction, making them increasingly accessible to the masses.
Before you leave
In general, the production of cowboy boots is very different from that of sneakers, running shoes, dress shoes, etc. That’s why cowboy boots inherit a very unique, distinctive and attractive style.
A pair of cowboy boots will need to go through almost all of the steps mentioned above! But according to some sources, some bootmakers have said that it can take them more than… 200 steps to complete a pair of elaborately handcrafted cowboy boots.
While handmade cowboy boots don’t usually come cheap, once you understand how intricate and time-consuming it is to make them, you’ll understand their true value.
That’s also why Texans love them, a pair of western cowboy boots takes a lot of flair and patience!
Try a pair, and you’ll fall in love with them!
Howdy y’all, and welcome to From The Guest Room, your ultimate guide to all things Western! I’m Jay Gatz, a lifelong cowboy boot enthusiast with over 5 years of experience in the Western style world. I’m excited to share my knowledge with you and help you discover the perfect cowboy boots and western gear to elevate your style. Let’s explore the rich history and timeless appeal of Western fashion together!